
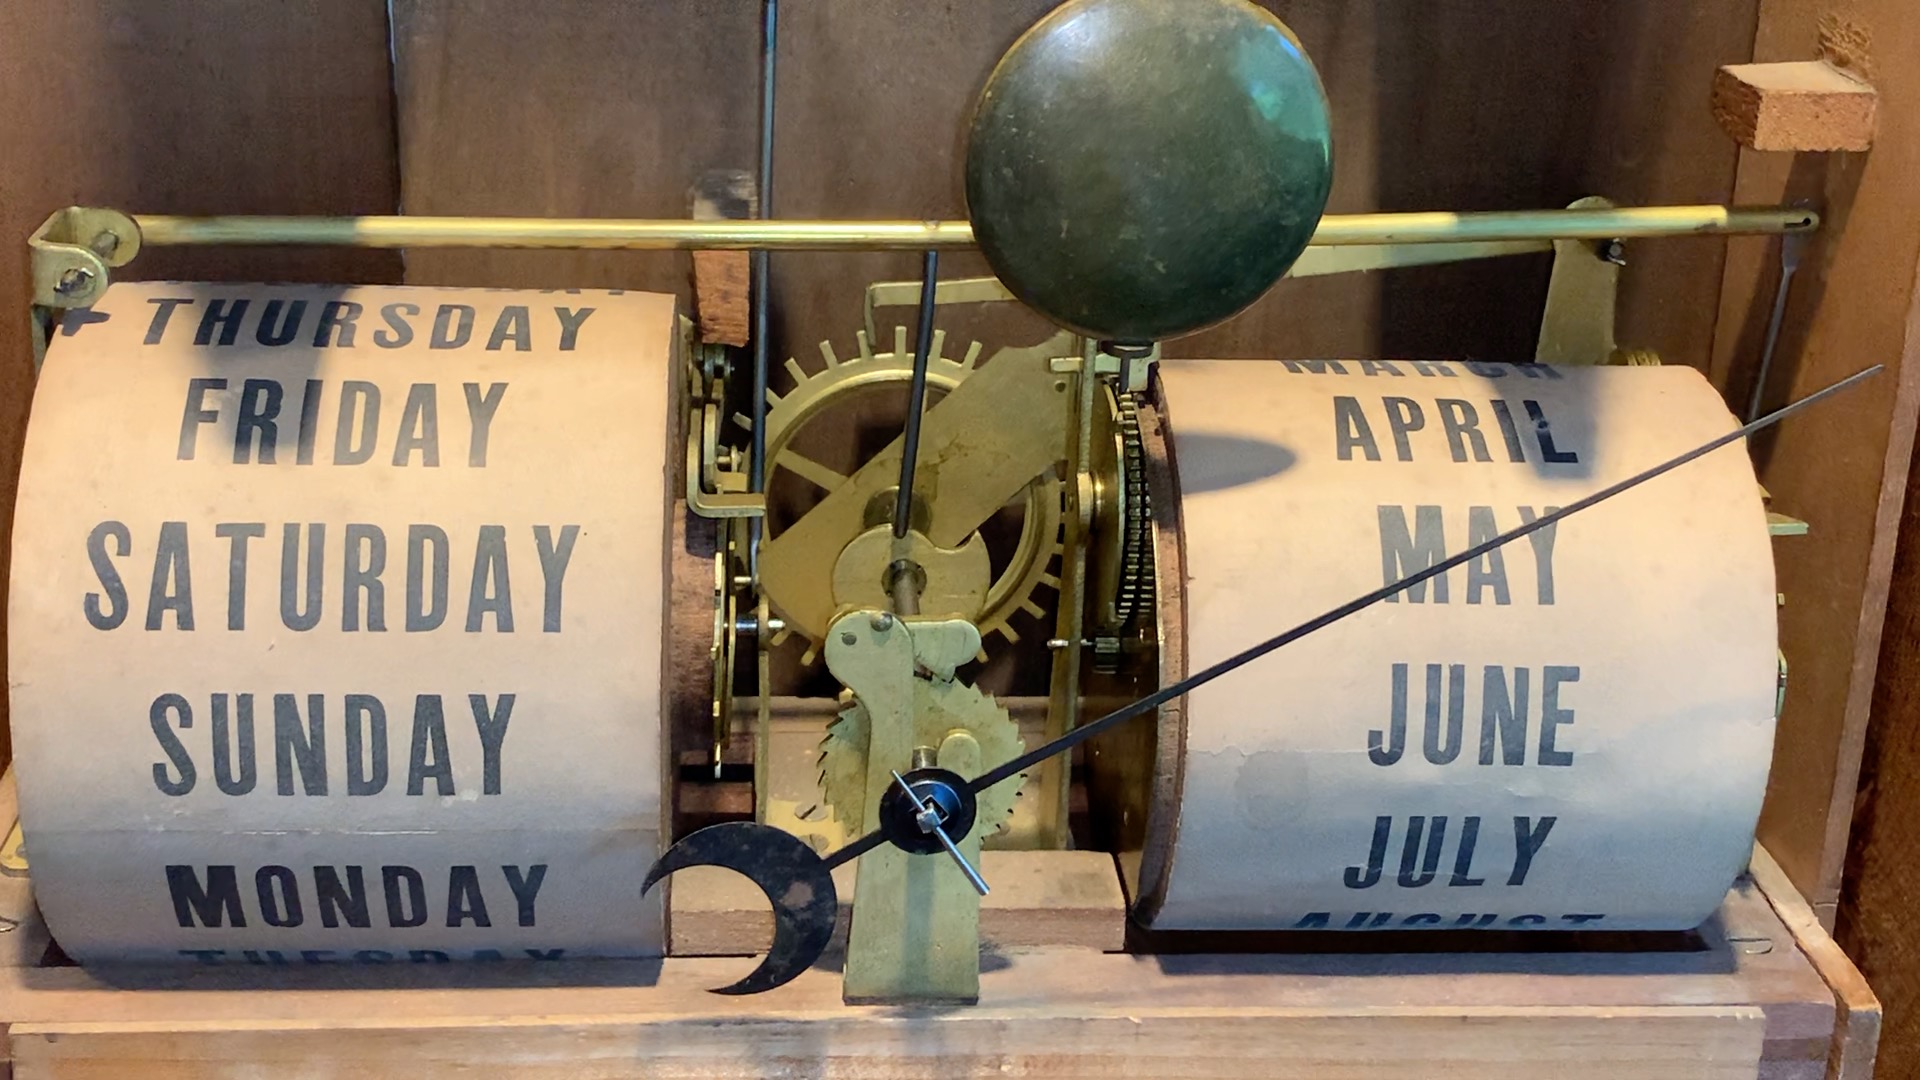
The Seth Thomas Office Calendar No. 2 is a large weight driven double dial calendar clock. They were made from about 1863 – 1890 and stand 44″ tall. Time is displayed on the top 14″ dial, and the day of the week, date, and month are shown on the lower dial of the same size.
The Seth Thomas Office Calendar No. 2 is a perpetual calendar. In short, this means the clock knows how many days each month has – February has 28, December has 31, etc. This clock goes one step further – it actually compensates for leap year.
Calendar Mechanism Walkthrough
Seth Thomas used 3rd party calendar mechanisms in many of their clocks; the mechanism in my Office No 2 is the Mix Brothers variant which has a kidney-shaped cam driving the calendar mechanism. The Mix Brothers calendar movement was used on the early Office Calendars from 1863 to sometime in the 1870’s. After that, Seth Thomas migrated to using the Andrews mechanism which uses a snail-shaped cam.
Lifting System
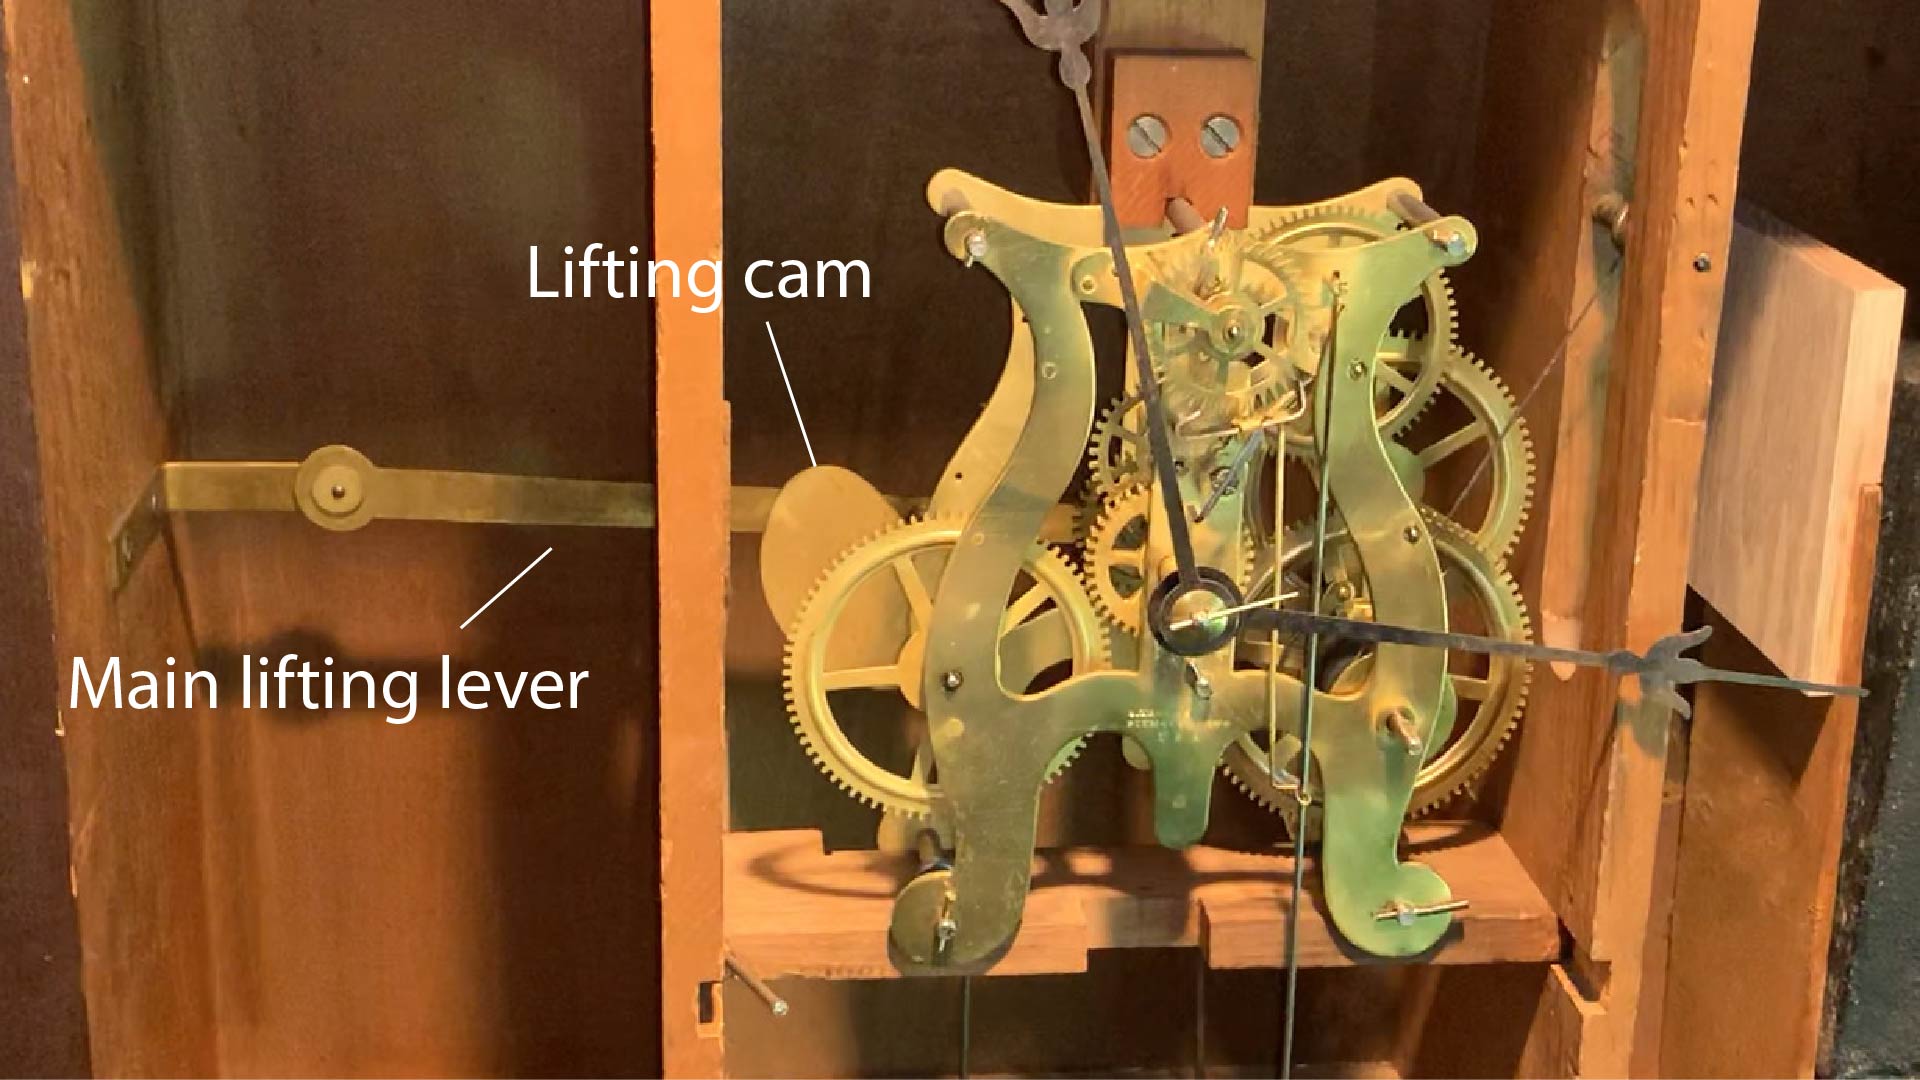
The calendar mechanism is driven from the time train by a wheel that rotates once per day. This wheel drives a kidney-shaped cam that in turn raises the main lifting lever. This lever raises two rods that drive the left and right sides of the calendar mechanism.

The left rod is connected to a ratchet mechanism that drives the day of the week drum. The right rod is connected to another rachet mechanism that drives the date of the month mechanism, which in turn drives the month drum.
Day of Week

The day of week drum is relatively simple. The wheel on the right side of the drum has 14 teeth, one for each day. The wheel takes two weeks to rotate fully. The two pawls at the top of the wheel lock the wheel into position so that it only advances one day at a time. The rear pawl prevents the wheel from going forward other than when lifted by the mechanism, the front prevents the wheel from reversing.
The day wheel is driven by a ratchet mounted on the drum side of the lever connected to the main lifting arm.
Date of Month
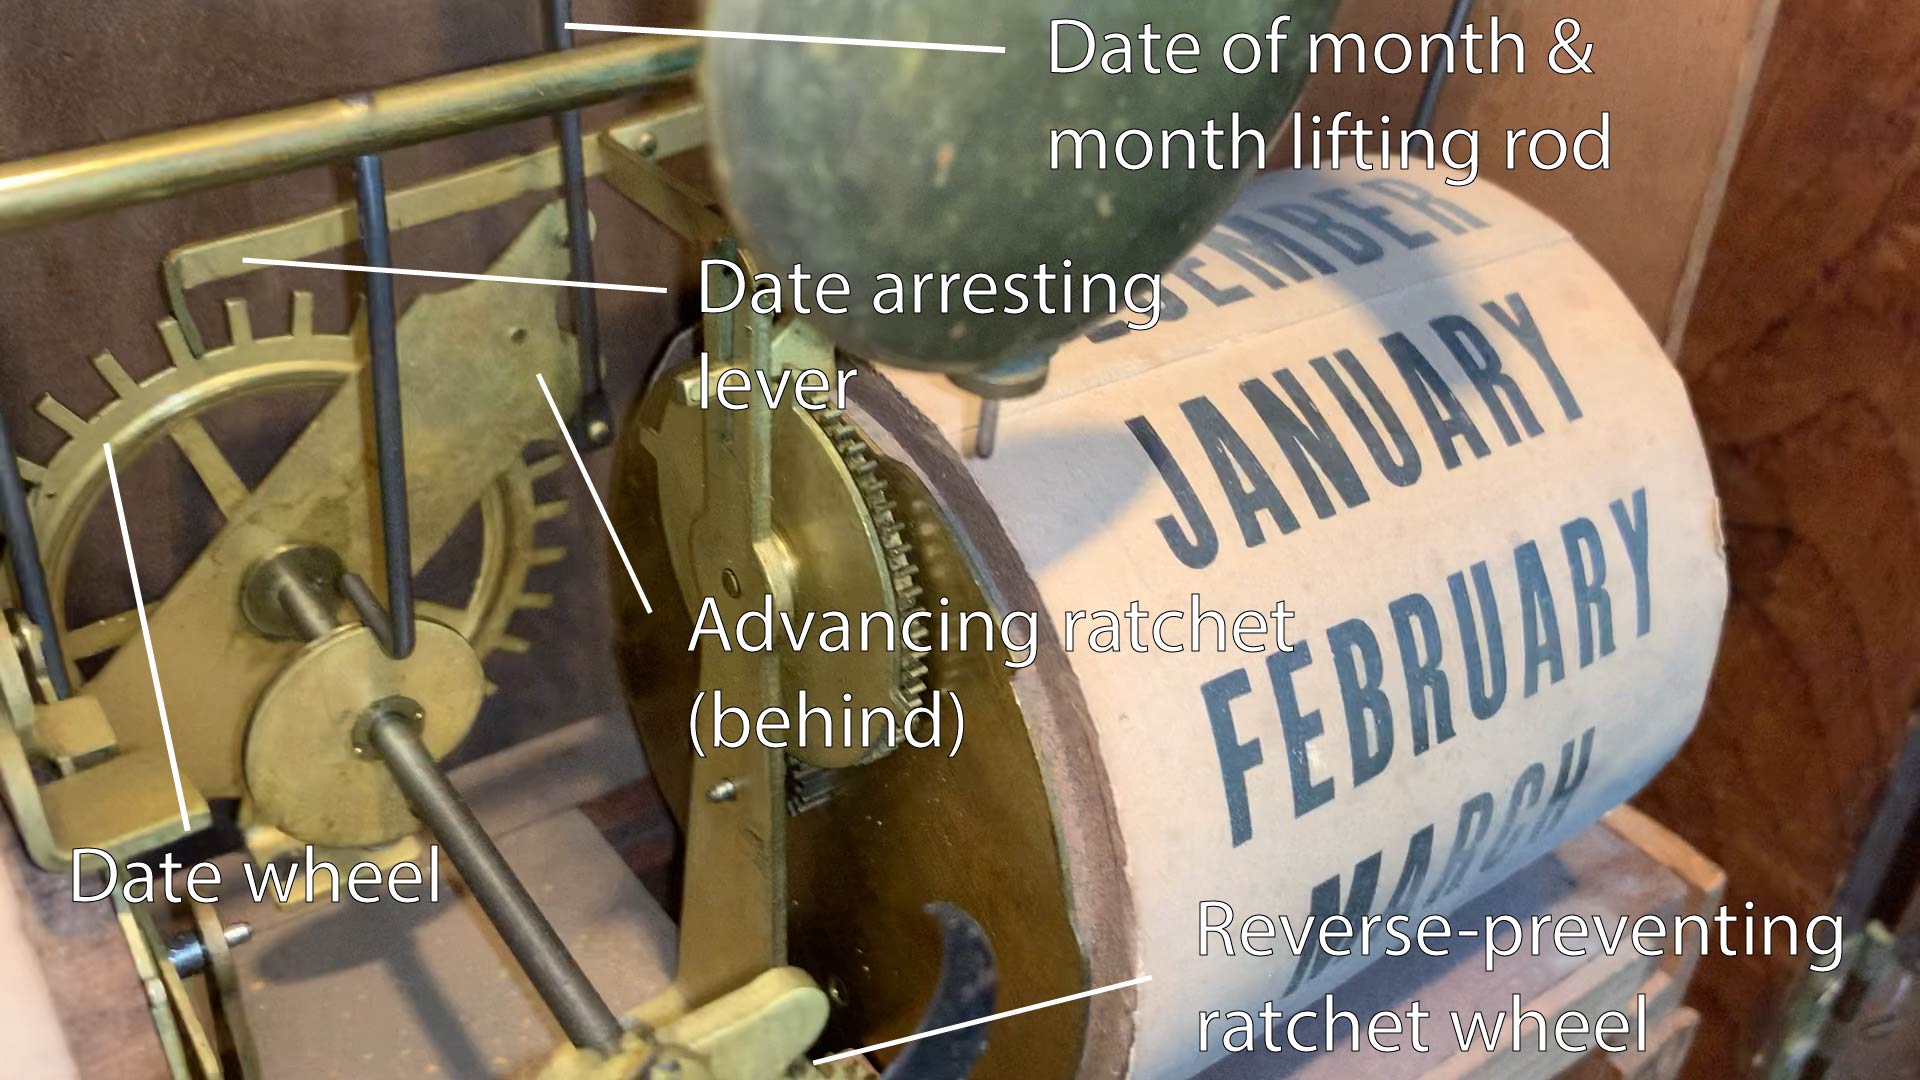
The date hand is driven by the right lifting rod from the main lifting arm behind the time movement. The date hand shaft has 31 teeth at the back of the mechanism – one for each date of the month, and at the front of the mechanism is the ratchet mechanism that prevents the date hand from moving backwards. The 31-tooth date wheel is advanced by a ratchet pawl on the back side of the next lever in the lifting linkage in a similar manner to the day of week wheel, and the date wheel is arrested after advancing one day by the stopping lever coming from the right side of the mechanism.
Month
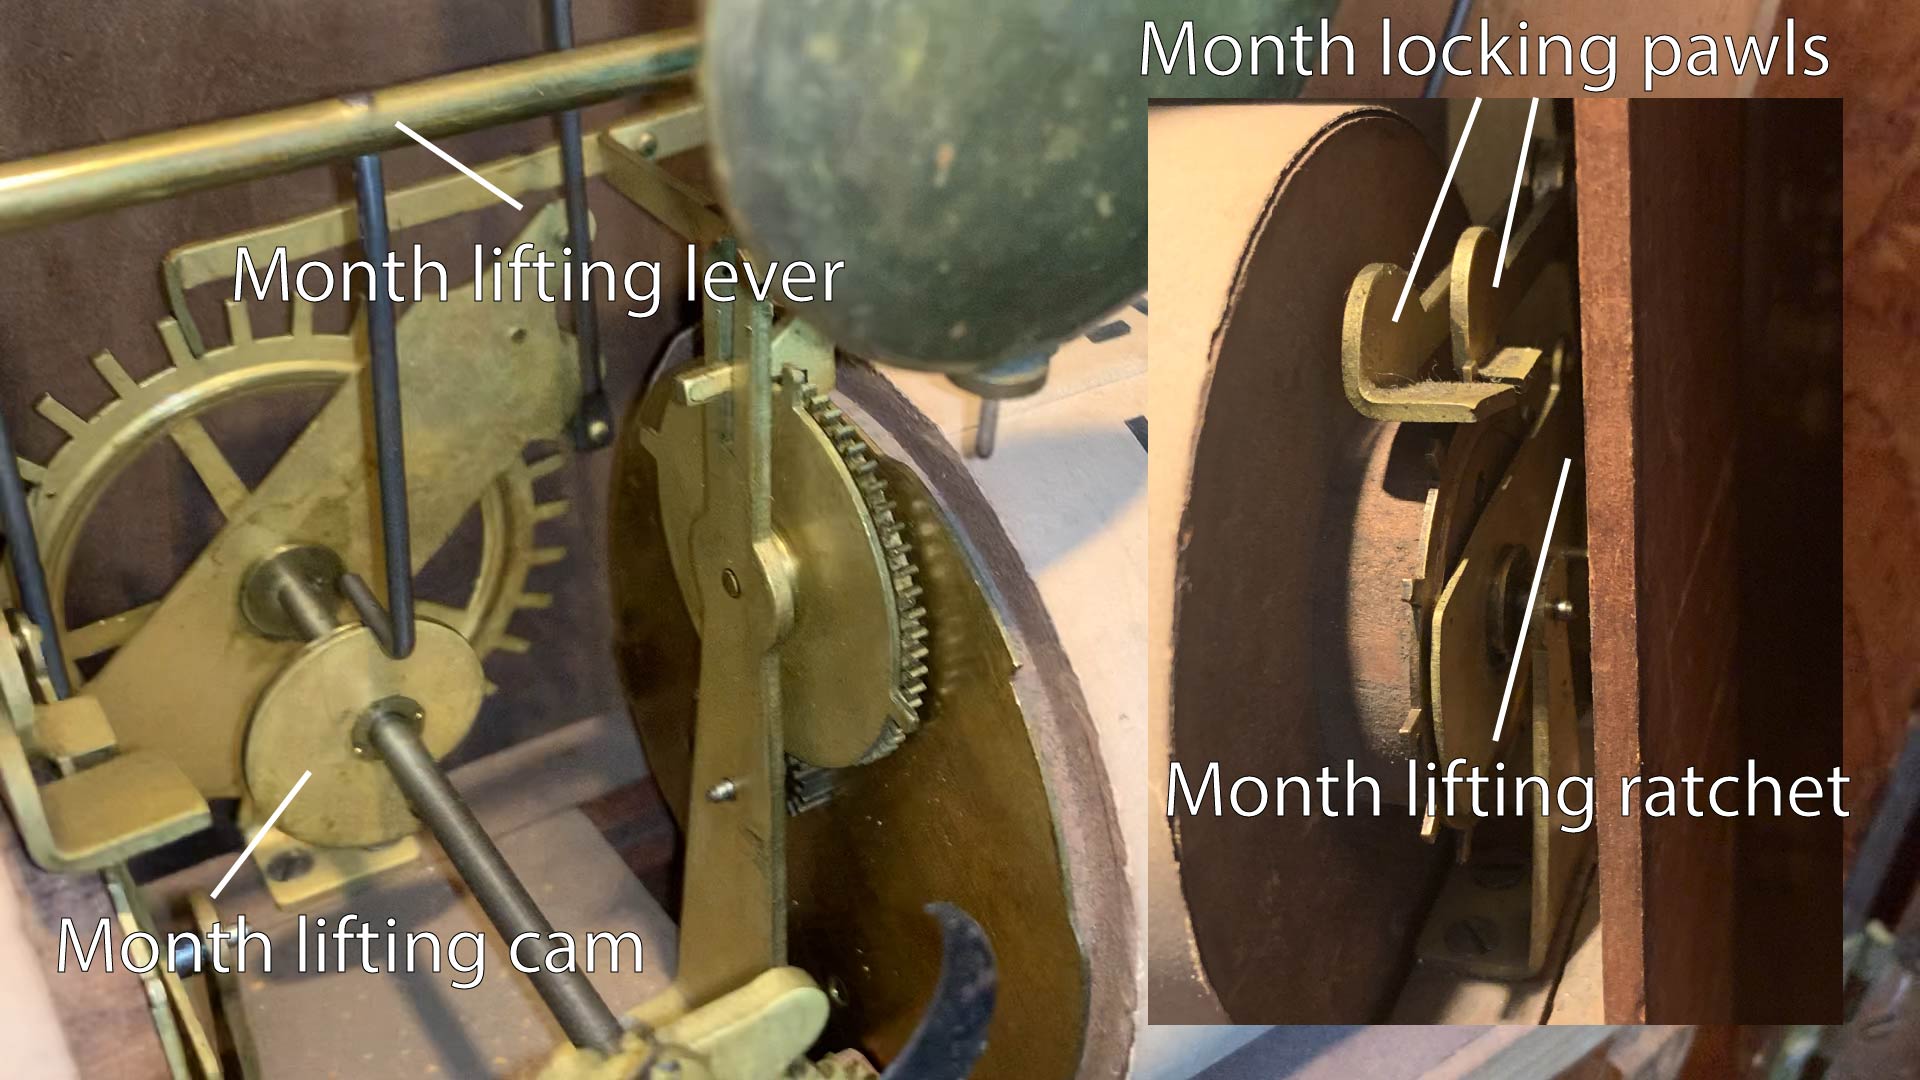
The month drum is driven off the date wheel shaft by a lifting cam that raises the month lifting lever. The month lifting lever drives a ratchet that advances the month wheel. The month drum is regulated by two pawls in the same manner used on the day of the week drum.
Perpetual Calendar Components
The perpetual calendar mechanism needs to advance the movement based on the variable number of days in each month. To do this, it needs to know how many days a given month has, and it then needs a mechanism to move forward the appropriate number of days – skipping the 31st for 30-day months like June, skipping the 29th, 30th, and 31st for a normal February, and skipping the 30th and 31st for a leap year February.
There are three components to the Mix Brothers perpetual calendar mechanism, the 30/31 cam plate, the 28/29 cam plate, and the date wheel itself, plus the perpetual calendar lifting lever.
Date Wheel
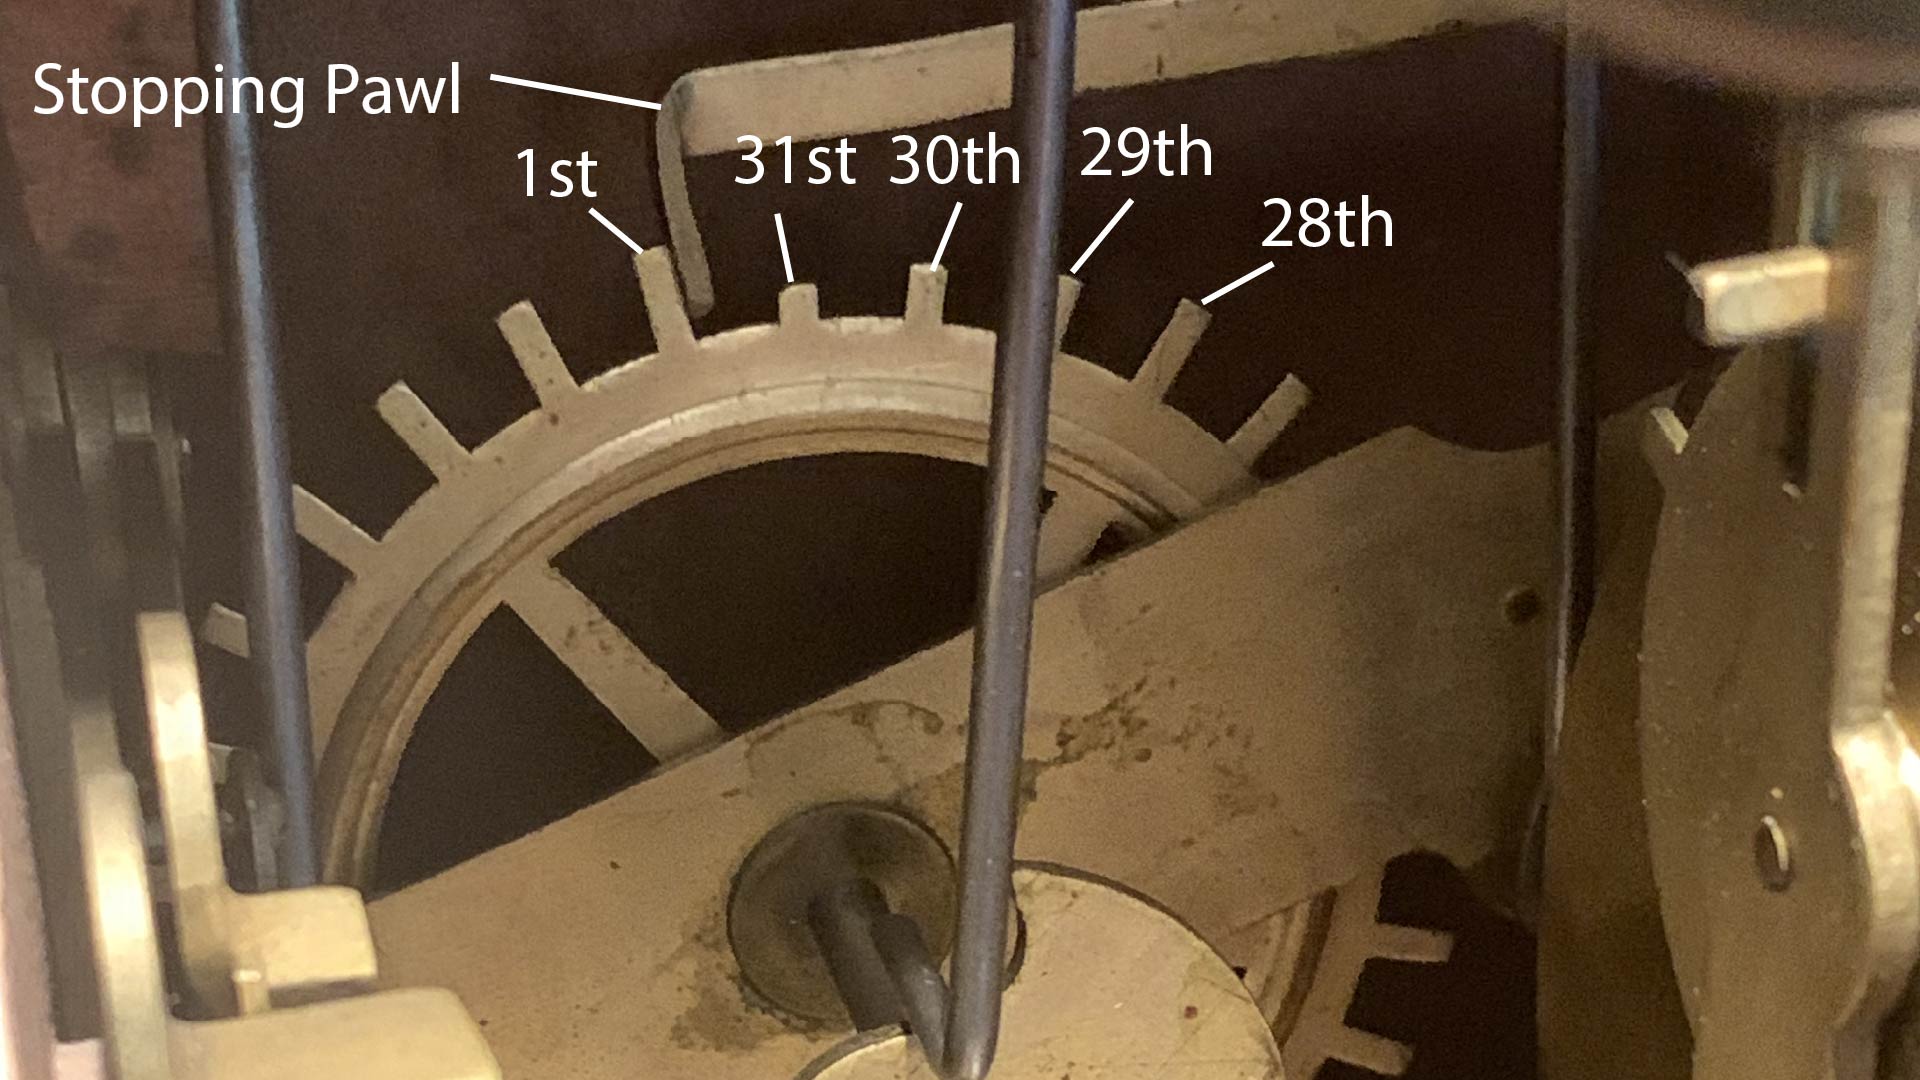
The date wheel has 31 teeth. 28 of these are identical, and the other three are shorter – decreasing in height with the 29th tooth being slightly shorter, the 30th tooth shorter yet, and the 31st tooth being the shortest.
30/31 Day Cam Wheel
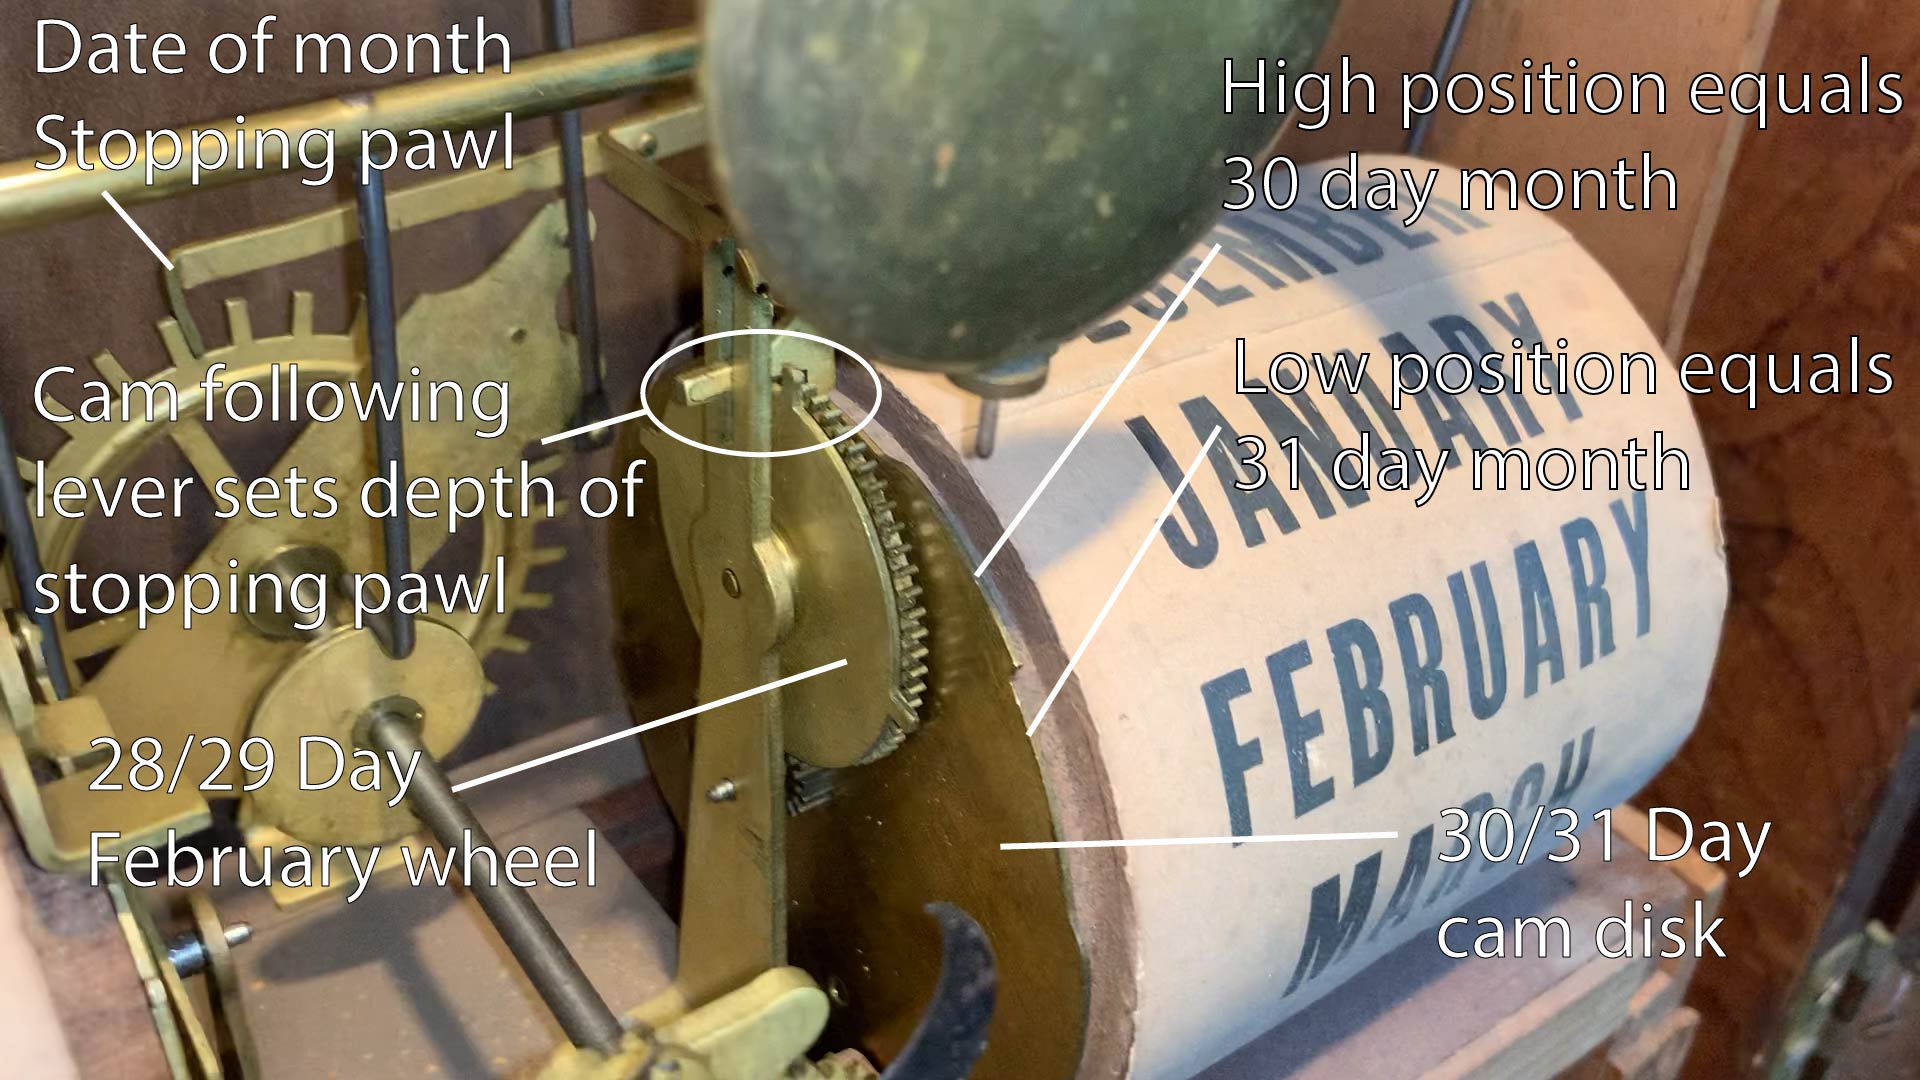
On the left side of the month drum is a thin brass cam disk with two levels. The lower position correlates with 31-day months and the upper position correlates with 30-day months. Note that the cam is read at the top of the drum, but the month is actually read on the front of the drum, so the cam positions are 90˚ off from the label positions.
28/29 Day February Wheel
Slightly left of the 30/31 day wheel is the February wheel. This wheel has four teeth – three are shorter, and one is slightly longer. The longer tooth is marked with two dots – this is the February 29th Leap Year tooth.
Perpetual Calendar Lifting Lever
The perpetual calendar lifting lever reads the position of the 30/31 day cam wheel and the 28/29 day February wheel. The position of these two wheels determines how far the day wheel stop lever advances.
Perpetual Calendar Operation
If the calendar is on a 31-day month, the 30/31 day cam wheel is in its low position and the February wheel is not engaged. The date wheel pawl drops all the way down to the bottom of the teeth of the date wheel and the calendar advances only one day for every day of the month, stopping at the 28th, 29th, 30th, and 31st days.
If the calendar is on a 30-day month, the 30/31 day cam wheel is lifted slightly. This causes the date wheel pawl to drop slightly less than all the way, and the pawl will stop the calendar normally on days 1-30 of the month, however the 31st tooth of the date wheel will pass under the date wheel pawl and skip directly from the 30th to the 1st.
If the calendar is on a Leap Year February, the lifting cam is raised slightly higher than the 30 day position and the calendar operates normally on days 1-29, but this lifting position is high enough so that both the 30th and 31st teeth pass under the date wheel pawl, and the clock jumps from the 29th to the 1st.
If the calendar is on a non-Leap Year February, the lifting cam is raised to it’s highest resting position and the 29th, 30th, and 31st teeth all pass beneath the date wheel pawl and the mechanism will advance all the way from the 28th to the 1st.
Adjusting the Calendar Mechanism
The principal means of adjusting the calendar mechanism is by lengthening or shortening the lifting rods by rotating the adjustment nut. Figuring out how the clock should be set requires removing both the time and calendar dials.
IMPORTANT NOTE: The calendar mechanism is a low speed device. It takes 18 hours to build up energy to fire, and it takes about 3 hours to actually fire the mechanism. When manually advancing the calendar mechanism, do it slowly or else very wrong things will happen. Lift the lever slowly, and lower it slowly to mimic the actual operation of the calendar mechanism.
IMPORTANT NOTE 2: The calendar mechanism is not intended to be lubricated. Do not oil it. Since the mechanism only activates once per day rather than tens of thousands of times per day like the time movement does, no lubrication is required.
IMPORTANT NOTE 3: The paper on the day of week and month drums are very fragile. Do not touch it. Touch the sides of the drums instead.
I have also done a video walkthrough of this content that may be helpful. This article goes into more depth, but seeing the mechanism in video may increase your understanding.
Step 1 – Remove the hands and dials
Carefully note the position of the calendar date hand and the time hands. Remove both the time and calendar dials. Reinstall the calendar date hand and the two time hands in their positions.
Step 2 – Understand how to adjust the lifting linkages

Both the day of week and date/month lifting linkages use eccentric nuts for adjustment. These are held in place by a locking nut underneath the eccentric nut that is tightened against the eccentric nut to prevent the eccentric nut from turning when you don’t want it to.
To adjust the length, loosen the locking nut and spin it down the lower shaft slightly. Then you can carefully rotate the eccentric nut to raise or lower the linkage. Turn the eccentric nut clockwise to shorten the linkage (causes the calendar levers to be pulled farther up), or counter-clockwise to lengthen the linkage (causes the calendar levers to be pulled less).
After making the adjustment, tighten the locking nut against the eccentric nut.
Step 3 – Make sure all gravity levers are in place.

The calendar mechanism needs gravity to be pointing down to operate. The clock will need to be standing for adjustment and a number of levers need to be flipped down in their operational position for the mechanism to work correctly.
There are two levers on the right side of the day of week drum, one in the front and center of the mechanism near the date hand, and two on the right side of the month drum that may become stuck after laying the clock down and must be flipped back into position.
Step 4 – Establish the Maximum Lifting Height of the Main Lifting Lever

Before attempting to adjust the calendar lifting levers, it is important to know how high the movement lifts the main lifting lever. On the left side of the time movement where the main lifting lever passes into the compartment with the movement, a metal plate defines the travel path and maximum height of the main lifting lever. This isn’t necessarily how high the time movement lifts the levers; it is a mechanical maximum for the clock.
To determine how high the calendar mechanism actually lifts the main lifting lever, wind the time movement forward until the kidney-shaped cam lifts the main lifting lever to its highest point. Unlike some movements where running the movement backwards can damage things, it should be OK to run this backwards a bit as the kidney cam doesn’t have a sharp drop off.
When the main lifting lever is in its highest position, note the position of the main lifting lever in the metal slot left of the time movement. Use a piece of tape or some other means of marking it. This is our lifting reference. Now wind the clock ahead to about 6:00AM or so – the position where the lifting arm is at the lowest point on the kidney cam (this may happen at a different time on your clock which can be adjusted later if you wish).
Step 5 – Day of Week Adjustment
The left lifting rod powers the day of week drum. Slowly lift the main lifting lever to the position you marked in step 3 and observe the wheel and ratchet mechanism to the right of the day of week drum. The ratchet mechanism should advance with a faint click sound. If you do not see the ratchet advancing, you probably need to shorten the lifting linkage (see Step 2).
Note also the position of the pin that raises the rear locking pawl. If the lifting rod causes the pin to bind against the pawl, your linkage is set too short and should be lengthened.
Step 6 – Month Drum Adjustment
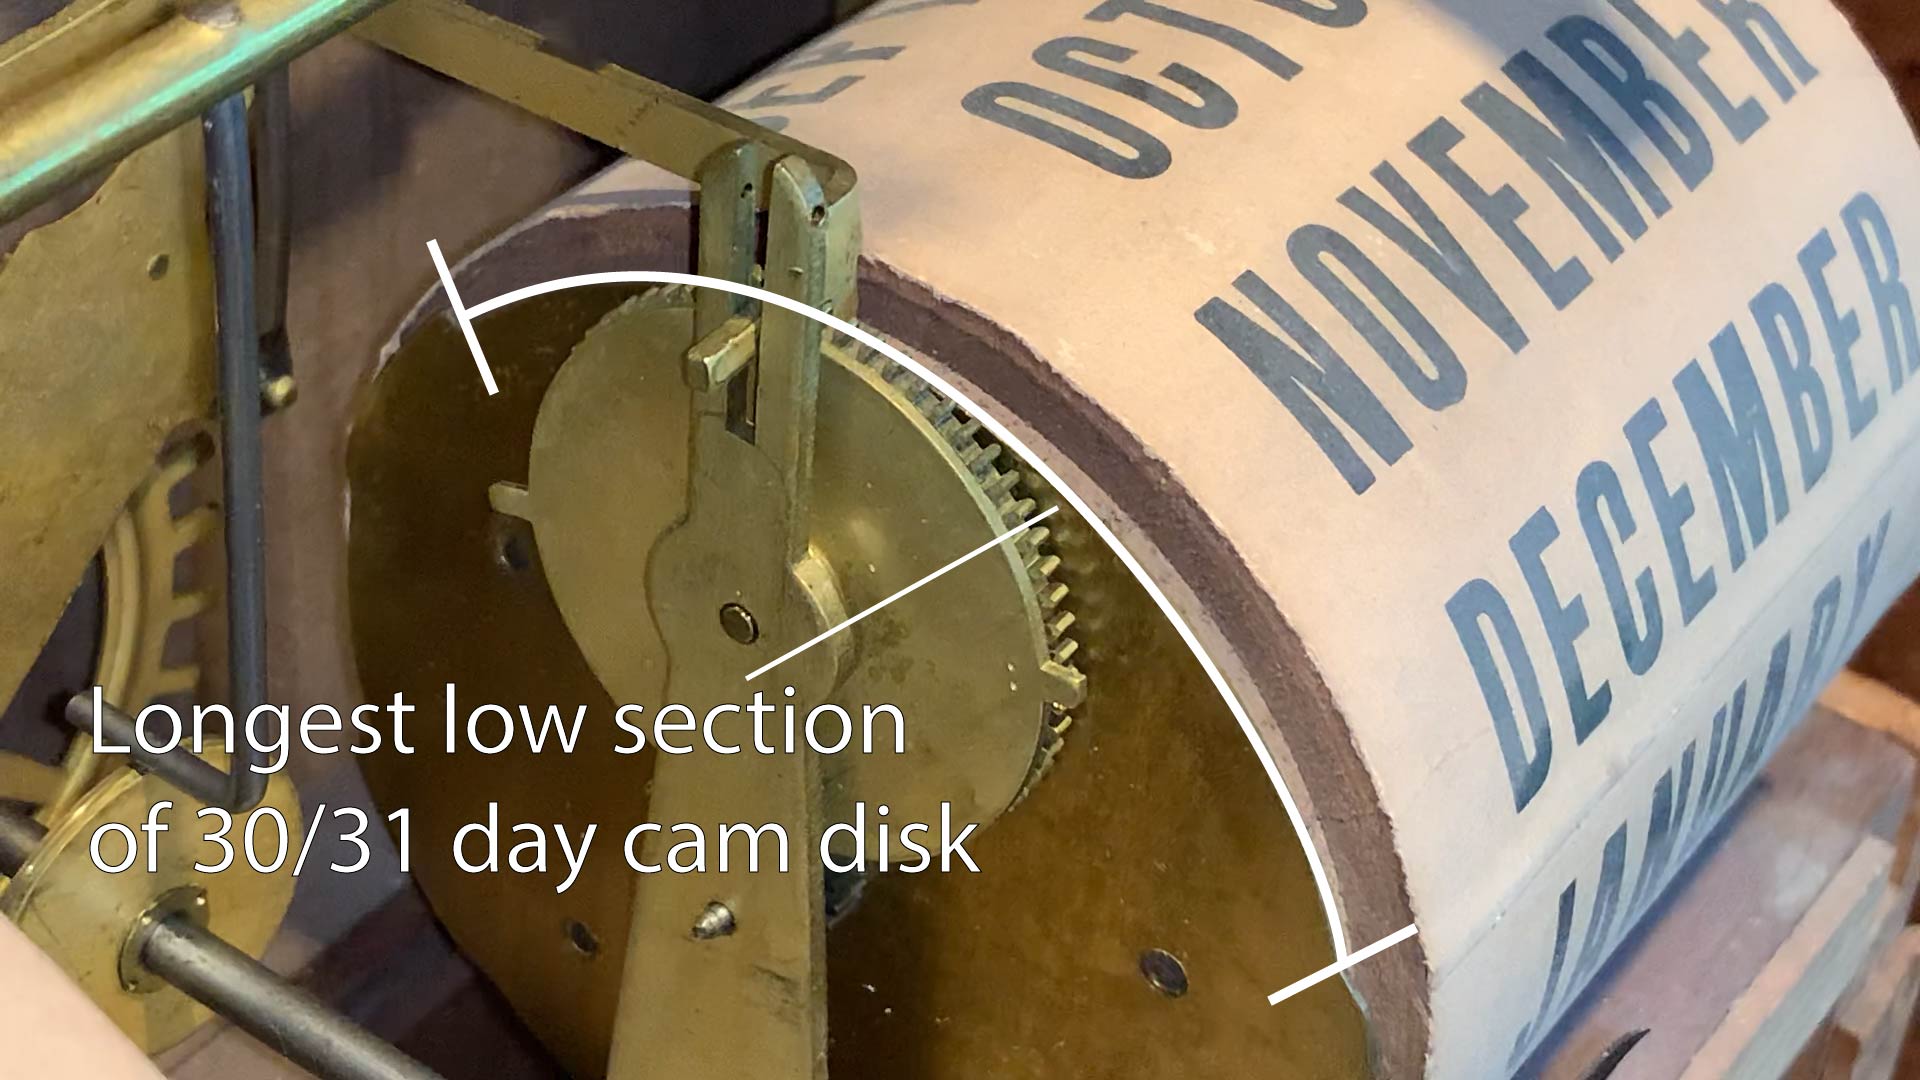
The paper with months printed on it needs to be correctly oriented to the 30/31 day cam disk. Because the cam disk is read at the top of the drum but the month printing is read from the front portion of the drum, the high cam positions do not line up with 30 day months. Instead, the month roll needs to be 90˚ ahead of the cam positions.
If your clock has original paper, this should already be correct, but if your clock has replacement paper, you may need to check this. The easiest way to align the paper on the drum is to look for the longest distance around the cam drum between 30-day bumps. The bump before the long low section should correlate to August, and the bump after the low section should correlate to January.
Step 7 – February Wheel Adjustment
The February wheel is driven off the month drum with a couple gears and a friction clutch. When the month drum shows February, one of the teeth of the February wheel needs to be under the cam following lever. Note in the picture above the February disk is out of alignment – February is to the front of the drum, but the February tooth is not under the cam following lever.
You can advance the month drum for testing by simultaneously lifting the cam following lever and the month advancing lever (the one that rides on the snail cam on the date hand shaft). It will be difficult to do fine testing this way as the end of the month day skipping mechanism is sensitive to how high the cam following lever is lifted, but you can advance this way to get close and then fire the calendar mechanism one day at a time by lifting the main lifting lever at the top of the clock by the time movement.
If the February tooth is not under the cam following lever when the drum displays February, you can carefully hold the edges of the month drum (don’t touch the paper!) and turn the February wheel with your fingers until the tooth is in position.
Step 8 – Day Skipping Mechanism Adjustment
The number of days to be skipped at the end of short months is determined by the cam following lever resting above the length of one or more of the shorter than normal date teeth. The cam following lever is directly connected to the date of month stopping pawl.
Make sure the date hand is on the shaft correctly – there are four potential positions the square hole in the hand can fit on the shaft. The correct one is where the hand points approximately toward the short teeth of the date wheel.
Set the month drum to a 31-day month. You can rotate the month drum if you lift both the cam following lever and the month advancing lever (the one that rides on the snail cam on the date hand shaft). Verify that the date of month stopping pawl goes to the bottom of the teeth on date wheel. Look at the 30/31 day cam disk on the left side of the month drum to make sure that the cam following lever is touching the cam disk.
If this needs adjustment, the best way to do it is to torsionally bend the cam following lever/date wheel stopping pawl slightly, which will adjust the relative position of the date wheel stopping pawl and the cam follower.
Carefully advance the calendar movement by lifting the main lifting lever (top of the clock by the time movement) to the position you marked to verify that the date wheel ratchet engages and the date wheel advances. If the ratchet doesn’t engage, you need to shorten the linkage (see Step 2).
Set the month drum to a 30-day month and observe the position of the date wheel stopping pawl. It should be raised slightly off the gullet since the cam following lever is now resting on the raised cam position of the 30/31 day cam disk.
Carefully advance the calendar movement by lifting the main lifting lever (top of the clock by the time movement) to the position you marked until you reach the end of the month. Go slow and verify that the shortest 31st tooth passes under the date wheel stopping pawl but the pawl reaches low enough to stop the 30th tooth. Make small torsional adjustments to the cam following lever if necessary.
Repeat this process for the 29 and 28 day months. The tooth with the two dots punched in it on the February wheel is the leap year tooth. Test this as well as a regular 28-day February.
If the date wheel doesn’t skip all the way from the 28th to the 1st, this could be because of a date wheel stopping pawl depth issue, or it could be that the lifting linkage is too short and the date lever is not being allowed to drop low enough to skip enough days. Lengthen the linkage following the procedure in Step 2.
Step 9 – Setting the calendar and reassembly
I recommend this order for setting and reassembly:
- If possible, locate the clock to where it is permanently going to live.
- Figure out leap year (see below)
- Quickly advance the month wheel so that you are in the correct year relative to leap year but about 1 1/2 months behind today’s date
- Put the calendar dial back on and reinstall the date hand
- Raise the main lifting lever carefully to the marked position and lower it repeatedly to advance the mechanism one day at a time until the calendar is one day behind today’s date
- Set the day of week drum to match the date hand by lifting and releasing the left lifting linkage to advance the day drum.
- Bring the calendar mechanism forward to today by winding the time movement through a cycle, stopping wen the kidney cam is at its lowest point.
- Reinstall the time dial and position the hands at 6:00 AM, roughly corresponding with the correct position of the kidney cam
- Set the time forward to the correct time.
If you have followed this entire guide, you should be familiar with how to quickly advance the month drum by lifting the month advance lever and the cam following/date stopping lever and then turning the month drum. Note that in normal operation the month drum rotates upward from the perspective of the viewing window. The February wheel rotates downward in operation, as it is geared off the month drum.
To set the clock correctly for leap year, observe the tooth of the February wheel that is shorter than the other three and marked with two dots. This article was written in July 2020, with 2020 being a leap year. Setting the clock correctly for July 2020 would have the marked February tooth at about the 1:30 position when looking at the side of the February wheel – the leap year tooth should have just passed the cam reading position at the top of the wheel, and then come forward slightly as the calendar is advanced from February until July. For July of 2021, the month drum would need to be rotated until the leap year tooth is at about the 4:30 position, etc.
Note: The easiest positions of the kidney cam to reference are when the main lifting lever is at its maximum and minimum positions. The maximum position should correspond roughly with midnight, which means the lowest position corresponds at about 6:00AM. As the calendar mechanism fires gradually on the falling stroke of the main lifting arm, that means the date change happens somewhere around maybe 3:00AM. I find this is acceptable for my taste, but if you want the date change to happen closer to midnight, you can rotate the hour hand backward a couple of hours so the maximum position of the lifting lever happens at maybe 10:00PM, and the minimum would therefore be about 4:00AM.
Also note that the calendar mechanism can’t be manually advanced when the time movement is high in its lifting cycle. If your clock stops or you need to make an adjustment for some other reason, it needs to be done in the morning or perhaps early afternoon – especially if you are in the month of February where the calendar mechanism needs a long stroke to skip days. Adjusting the calendar mechanism to fire closer to midnight may make your adjustment window shorter.
If you’ve made it this far, congratulations! Hopefully you have a working calendar mechanism. If you’re still having trouble with something, take your time and narrow down the problem and observe the mechanism carefully. Look for bent stuff, overly loose things, etc. You can also compare your clock mechanism to mine in the walkthrough video I did. Good luck!
One reply on “Adjusting a Seth Thomas Office Calendar No 2 Mix Brothers Calendar Movement”
The information you have given is excellent, especially since I haven’t worked on a calendar clock before.
Thank you